
Apart from the Docker specific steps, rest of the steps related to installing LAMP on Ubuntu are generic and can be used for installing LAMP stack on any version of Ubuntu
Eg. Ubuntu 21.04 / 20.10 / 18.04 / 16.04 / 14.04 ...
Introduction
A tech stack is a set or a package of technologies that often get used together to make a web-service or an application work, LAMP Stack is one such famous tech stack that is used for hosting various websites and web-applications. LAMP Stack is an acronym of the technologies it comprises, following are the technologies it is made up of
- Linux – Operating System(OS)
- Apache – Web Server(HTTP Server)
- MySQL – Relational Database Management System(RDBMS / DB)
- PHP – Server side programming language
In this guide, I’ll help you install LAMP Stack on Ubuntu 20.04 on your local Docker instance but the same steps can be used for installing LAMP Stack in any version of Ubuntu with or without Docker
Before beginning please go through the prerequisites section
Prerequisites
In order to be able to complete this guide please ensure
- You finished the previous guide successfully
- Ubuntu 20.04 has been successfully installed and working on your local Docker instance
- Your local Docker Engine or for Windows user Docker Desktop application is up and running
Without any further ado let’s begin.
Step 1: Create a new working container from the existing base image.
In the world of Docker we always work on containers, no changes are made to Docker Images unless we are creating an Docker Image ourselves. Docker Containers is where all our custom work or work specific to an application or service takes place.
Run the following command in your favorite command-line tool to create your new docker container
docker create -it –name lamp-server -p 80:80 ubuntu:20.04
Here’s the syntax of the above command
docker create -it –name {random-new-container-name} -p {host-port}:{container:port} {docker-image}:{image-tag}
The above command will create a new container called lamp-server, you are free to use any name for your container. The above command will use the Docker Image that you previously downloaded called ubuntu having the tag 20.04. It will also map port 80 of the host system to port 80 of the new container system such that any request coming towards port 80 of the host system will get handled by port 80 of the new container. You are free to map any port to any port or not map ports at all.
docker create command consists of many command-line options for creating a new container, explaining each option in detail is out of the scope of this guide, for further guidance please visit the following link
https://docs.docker.com/engine/reference/commandline/create/
Step 2: Verify if the command mentioned in Step 1 ran successfully or not, verify if a new container named lamp-server got created or not
Run the following command using your favorite command-line tool to see a list of all your existing containers
docker ps -a
If your new container got created successfully then the above command will show a similar looking list
CONTAINER ID IMAGE COMMAND CREATED STATUS PORTS NAMES
1513919767a7 ubuntu:20.04 “/bin/bash” 9 seconds ago Created lamp-server
Step 3: Start and SSH into the new container so that we can start installing LAMP Stack.
Currently, even though you have created the container, it is not in a running state and nothing has been installed inside it. Docker Container is like a miniature version of the OS which works independently of other containers and the host system. So making changes in 1 container have zero impact on other containers or the host system in general.
So we’ll now first turn-on our new container or in other words start our container.
Run the following command to start running your existing container
docker start lamp-server
Running the above command will start your container, to verify if its running or not run the following command
docker ps
The above command is the same as docker ps -a except that the -a command-line option will display a list of all your containers whether running or not, whereas running this command without -a option will only display those containers that are currently in running state. So if your container is now running Docker should display you a similar looking view
CONTAINER ID IMAGE COMMAND CREATED STATUS PORTS NAMES
faa073582df1 ubuntu:20.04 “/bin/bash” 6 minutes ago Up 5 minutes 0.0.0.0:8880->80/tcp lamp-server
Now that we know that the container is in running start we now need to SSH into it so that we can run our commands for installing LAMP Stack
Run the following command to SSH into a running container
docker exec -it lamp-server /bin/bash
Running this command will change your command-line tool’s prompt, indicating that you are no longer in your host system but rather inside your container. CONGRATULATIONS!!!!!!!!
The following steps are not docker specific and can be performed on a non-containerized Ubuntu system
Step 4: Setup Ubuntu so that it is compatible for installing and running LAMP Stack.
Before jumping into installing and setting up various LAMP Stack components we’ll be first setting up our Ubuntu system.
Run the following commands one after the other in your fresh Ubuntu system to make the required changes, please note that these are interactive commands so you might be asked to choose certain options which your can based on your preference
apt-get update
apt-get install -fy apt-utils
apt-get install -fy build-essential tcl
apt-get install -fy software-properties-common
apt-get install -fy curl htop man unzip vim wget nano
If there are any permission issues when running the above commands then try running them using sudo.
Once the above commands have been run successfully we can now finally start installling LAMP Stack components
Step 5: Installing & setting up Apache in your Ubuntu Docker-Container.
Now that your Ubuntu system is ready, we will now begin with first installing the latest version of Apache which is Apache2.4 at the time of writing this guide.
Run the following commands sequentially to install Apache2.4 in your Ubuntu Docker-Container
apt-get update
apt-get install -fy ufw apache2
Assuming the above commands ran successfully, you should now have Apache 2.4 installed on your system, we now need to ensure that ports 80 and 443 are open.
Run the following command to see if Apache profile is available for opening the required ports or not
ufw app list
You should now see a view similar to
Available applications:
Apache
Apache Full
Apache Secure
If you wish to see what ports do Apache Full represents then run the following commands
ufw app info “Apache Full”
You should now see a view similar to
Profile: Apache Full
Title: Web Server (HTTP,HTTPS)
Description: Apache v2 is the next generation of the omnipresent Apache web
server.Ports:
80,443/tcp
As you can clearly see opening the ports in Apache Full profile will open ports 80 & 443 for receiving requests.
Run the following commands to open ports in profile Apache Full
ufw allow in “Apache Full”
Your Apache server is now ready to receive web requests.
Run the following command to check the status of your Apache service
service apache2 status
Run the following command to start your Apache service if it is not running already
service apache2 start
Now run the following command to check if your Apache server is up and running and listening to requests coming onto port 80
curl http://localhost
You should see an HTML output, representing that Apache is running and is listening to requests coming onto port 80.
But here’s the surprise if you performed all the previous steps properly with regards to setting up Docker-Container then you should be able to access this site from your host system as well.
Open your browser in your host system and try accessing this site by visiting the following URL
http://localhost:8880/
If everything worked fine then you should see a similar looking page in your browser window

The above page that you see is the default Apache page, but this is enough for us to know that all our setup till now is working correctly.
We’ll now move onto installing the remaining components of our LAMP Stack i.e. MySQL and PHP
Step 6: Install and Setup MySQL
MySQL is one of the leading Relational Database Management System(RDBMS). A database works in the backend and helps store data related to a user and his actions so that you can always present him with a customized user experience.
Run the following command to start installing MySQL Server interactively
apt install mysql-server
Once the above command has been run and all the installation steps have been performed you should have the latest version of MySQL which at the time of writing this blog is MySQL8.0 installed in your Ubuntu Docker-Container.
Run the following command to see if the MySQL service is running or not
service mysql status
Run the following command to start running the MySQL service if it is not running already
service mysql start
Run the following command to see the version of MySQL currently installed
mysql -V
Running the above command should show you a similar looking view
mysql Ver 8.0.23-0ubuntu0.20.04.1 for Linux on x86_64 ((Ubuntu))
Please note that your current default setup of MySQL is not secured, this setup is acceptable for local development server but not for production server.
Following steps should be performed especially for MySQL Server on production environment.
Run the following command to start the helper script from MySQL to help remove some risky default settings related to overall access to the DB and user permissions
mysql_secure_installation
After running the above command you should see the following question
Would you like to setup VALIDATE PASSWORD component?
Press y|Y for Yes, any other key for No:
You should press Y.
The next question it will ask you is
There are three levels of password validation policy:
LOW Length >= 8
MEDIUM Length >= 8, numeric, mixed case, and special characters
STRONG Length >= 8, numeric, mixed case, special characters and dictionary file
Please enter 0 = LOW, 1 = MEDIUM and 2 = STRONG:
You should press 2 for the strongest password setting.
After this, you’ll be presented with the next screen
Please set the password for root here.
New password:
Re-enter new password:
Estimated strength of the password: 100
Do you wish to continue with the password provided?(Press y|Y for Yes, any other key for No) :
You should set your password as per the password rules set by MySQL, best to note it down somewhere so that you don’t lose it, and finally, press Y to save your changes.
The next question it will ask you is
Remove anonymous users? (Press y|Y for Yes, any other key for No) :
You should press Y.
The next question it will ask you is
Disallow root login remotely? (Press y|Y for Yes, any other key for No) :
You should press Y.
The next question it will ask you is
Remove test database and access to it? (Press y|Y for Yes, any other key for No) :
You should press Y.
The next question it will ask you is
Reload privilege tables now? (Press y|Y for Yes, any other key for No) :
You should press Y.
This concludes installing MySQL Server in your local Ubuntu Docker-Container as well as securing it.
We’ll now move onto installing the last remaining component of LAMP Stack i.e. PHP
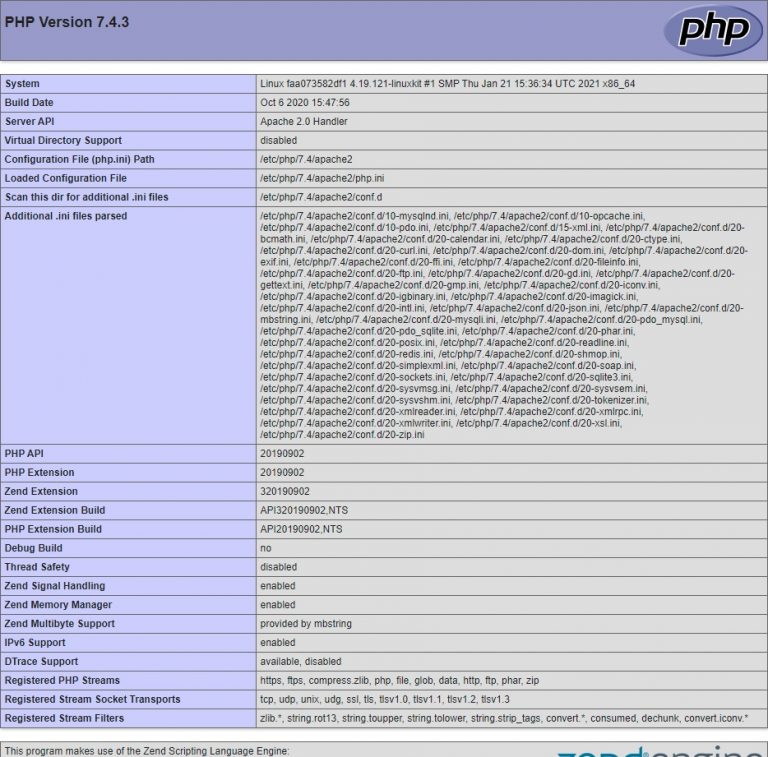
Step 7: Install and Setup PHP
PHP is one of the leading server-side programming languages powering more than 60% of the sites around the world.
Run the following command to start installing PHP
apt-get update –fix-missing
apt-get install php7.4 libapache2-mod-php7.4 php7.4-pdo php7.4-mbstring php7.4-tokenizer php7.4-ctype php7.4-json php7.4-bcmath php7.4-zip php7.4-mysql php7.4-curl -y
service apache2 restart
Run the following command to verify if PHP got installed successfully
php -v
To see if Apache and PHP are working in sync just make the following changes in the sample Apache site
echo “<?php echo phpinfo(); ?>” > /var/www/html/php-info.php
This will add a new PHP file inside the default Apache website directory. Now access the website just like how you did after finishing Step 5: Install Apache i.e. open your browser in your host computer and access the following url
http://localhost:8880/php-info.php
If you performed all the previous steps correctly you should see the entire information related to PHP7.4 installed in your Ubuntu Docker-Container system. A similar looking page should open in your browser
This concludes this guide on how to install LAMP Stack on Ubuntu20.04 in Docker-Container.
Hope this guide was helpful to you. Please do drop a feedback so that we can improve this guide further.